Restore a previous version
This article applies to all Lime Editor layouts: pages, posts, saved layout templates, saved rows/columns/modules, and Themer layouts if you have Beaver Themer installed.
Restoring refers to several scenarios:
Lime Editor hangs while you're editing a page.
Lime Editor autosaves as you work, so if your page hangs as you're editing it, usually reloading the page in your browser will get back what you were working on.Restore a published item that you deleted.
Deleting a published item means sending it to the trash. If you haven't emptied the trash, you can restore the item you deleted. Use the instructions in the next section.Revert to a previous version of a published item.
Lime Editor uses the native WordPress revision functionality to let you revert to previously published versions. See the instructions in the last section.
Restore a deleted page, post, or saved item from the trash
- Do one of the following.
- For saved pages and posts: in the WordPress admin panel, click Posts or Pages.
- For saved templates, saved rows/columns/modules, and Themer layouts: In the WordPress admin panel, click Lime Editor, then select the type of saved object.
If you don't see Lime Editor in the admin panel, see this article on enabling it.
Just below the title and above the list of items, click the Trash link.
If you don't see the Trash link, it means there's nothing in the trash.
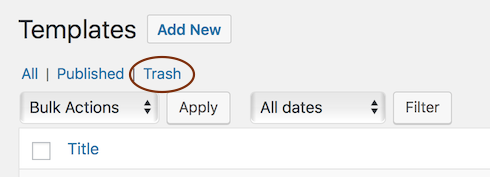
Mouse over the item in the trash and click Restore.
Revert to a previous version
There are two ways to revert to a previous version: the easy way and the hard way. The easy way works for all Lime Editor layouts. The hard way works for all Lime Editor layouts as well as native WordPress content and most custom post types.
A revision is created for Lime Editor layouts each time you click Done > Publish. Only the most recent 25 revisions are maintained. If you use database optimization, such as a plugin that removes revisions, you may lose the ability to restore a revision.
The easy way to revert a Lime Editor layout
In the easy way, you can view previously published versions of Lime Editor layouts and choose the one you want to revert to. Any custom CSS and JS code set in a layout version are restored along with the layout.
Open your current Lime Editor layout for editing.
On the Tools menu, click Revisions.
The Tools menu is in the upper left corner of your screen. Access it by clicking the down arrow in the title bar.
The previous versions of that page or post are displayed in a list, as shown in the following screenshot.
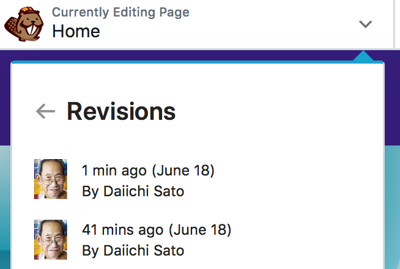
Click one of the revisions to preview the layout.
The preview screen is shown in the following screenshot.
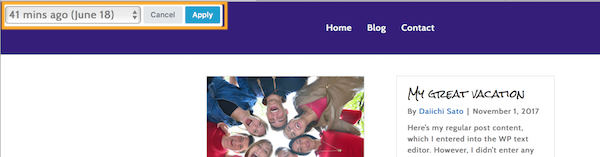
Click Apply to accept that revision or Cancel to revert to your current layout.
Publish the page to finish accepting the older revision, or discard your changes to return to the currently published page.
The hard way to revert
This method uses native WordPress Revisions UI to compare the content markup between the current page and a previous revision. This is the method to use if you have content in the (non-Lime Editor) WordPress editor. This is also a good way to use for Lime Editor layouts if you want to get a more detailed comparison of the exact markup differences.
1. Open the item for editing in WordPress
To revert to a previous version of a page, post, or custom post, whether or not Lime Editor is used for layout:
- Open the page or post for editing in the WordPress editor.
Don't launch the Lime Editor editor.
To revert to a previous version of a saved template, saved row/column/module, or Themer layout:
In the WordPress admin panel, click Lime Editor, then select the type of saved object.
If you don't see Lime Editor in the WordPress admin panel, see this article on enabling it.Click Edit under the item that you want to revert to open the WordPress editor.
Don't launch the Lime Editor editor.
2. Open the Compare revisions screen
Access the Compare revisions screen in either of the following ways:
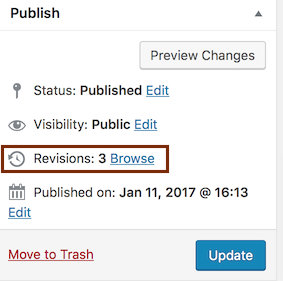
Click Revisions in the Publish panel.
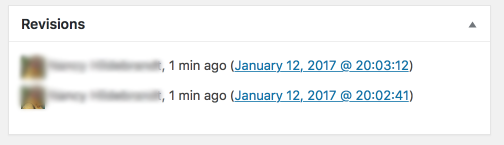
Click a revision in the Revisions panel, which is underneath the text editor. If you want to restore the version immediately before the current version, you'd click on the second item in the list.
Can't see the Revisions panel? Chances are the problem is one of the following:
- You don't have any older versions of that item.
- You haven't enabled it in the screen options. Click Screen Options in the upper right corner, then select the Revisions checkbox.
3. Restore the revision you want
Verify the revision you want and click Restore this revision.
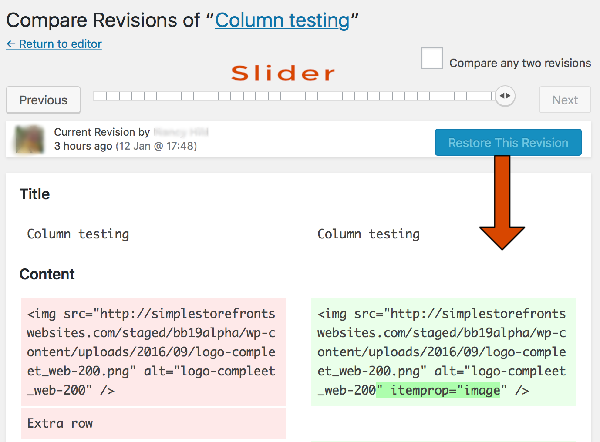
Here are some tips for understanding the Compare revisions screen.
Use the slider at the top or click the Previous button to display the revision you are interested in restoring on the right.
Tip: Sometimes it's easier to click directly on the slider circle (containing the arrows) and use the left and right arrow keys on your keyboard to navigate.The Restore this revision button always restores the version displayed in the RIGHT column. When you are displaying the latest version in the right column, the button is dimmed.
The left column always displays the previous version to the one on the right, unless you select the Compare any two revisions checkbox, in which case the earlier version you select on the slider is always displayed on the left, the later version you select on the slider is displayed on the right.
Markup highlighted in green is an addition from the two versions being compared. Markup highlighted in pink is a deletion from two versions being compared.
This screen is a bit counterintuitive because often you want to restore the version in the LEFT column, but you can't do that. If that's the case, click Previous to move the version in the left column to the right column, then click Restore this revision.